Thursday, February 26, 2009

No-waste Flying Geese

This is my favourite method for making flying geese. It is quick, you can power sew and there is no wastage!

You start with one square the width you want your finished (see note at end of post) flying geese unit to be plus 1 1/4" and four squares that are the height of the finished unit plus 7/8".
On these smaller squares you need to draw a diagonal line on the wrong side of the fabric - you can use anything you like here, pencil, pen etc.


I love using the quick quarter ruler to mark my diagonal lines.

Next, with the right sides of the fabric together you place two of your ruled smaller squares on the larger square as in the picture below. They will overlap slightly.


I like to pin them as illustrated to keep them steady.

Next, you sew a scant 1/4" seam either side of the line you have drawn.


Then use your ruler and rotary cutter to cut along the line.


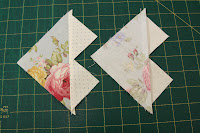
Press the seams towards the small triangles. You will have two units that look like this.


The next step is to line up another small square on the large triangle and again sew a scant 1/4" seam on either side of your line.


Cut along the line again to create two units.


Last step! Press the seam towards the smaller triangle. Congratulations, you have a completed flying geese unit!


Now all you have to do is trim the little triangles off. In the photo above I have trimmed 3 and left the one in the top right hand corner so you could see what they look like untrimmed.

A note on the measurements: The "finished" measurement is what you want the unit to measure after it is sewn into your quilt or project. For example, I wanted the flying geese pictured above to measure 3 3/4" wide by 2" high when sewn into the quilt, so raw they are 4 1/4 across and 5.5" high. I hope this makes sense.

Saturday, February 21, 2009

Carpenter's Star Workshop Oct 2008

Well, I have finally ventured in to blog land! I have found reading other craft blogs to be so valuable that I thought I'd like to have a place to share all of the tips and great ideas that I have picked up over the years. I'm hoping that over the next couple of weeks I can add lots of pictures and links to fabulous things I have discovered in the world of patchwork and sewing - I just have to figure out how to use blogspot properly!

First, a bit about me....My name is Shontelle and I have loved making things since I was a little girl...longstitch, hobbytex, cross stitch, tassels, embroidery, ceramics, decopage - this list goes on. It wasn't until my mum, Sharon, bought me a sewing machine and signed us up for a Sampler Quilt class at our local quilt shop that I discovered patchwork and I have been an addict ever since. So much so that in 2007 Mum bought an A1 longarm machine and now runs a machine quilting business called Patchwork on Parade from home. As part of the business we hold workshops and retreats a few times a year. So apart from using the blog to share tips it will also feature details of past and future workshops.

Last October we held our first workshop and we had a blast. It was a busy, tiring day - but loads of fun. The quilt that we chose to teach was Debbie Maddy's 'Carpenter's Star'. It is a fantastic pattern that uses half square triangles to make the star - no templates or hand-piecing. It was such a thrill to watch all of the quilts take shape and to admire all of the different fabrics that the ladies had selected.


Some of the wonderful ladies at our workshop

To prepare for the workshop Mum, the fabulous Barbarella (a member of our quilting group), and I went to Wallaroo for a weekend of power sewing. Barb and I completed our 'Carpenter's Stars' (minus borders) and Mum completed her 'Antique Nine Patch' quilt, which we will be teaching at our next workshop in March.


Mum with her 'Antique Nine Patch' and Barb and I with our 'Carpenter's Stars'

Mum quilted Barb's 'Carpenter's Star' and it went on to win first prize for edge to edge quilting at the 2008 SA Quilter's Guild Exhibition
.
Mum with the award winning quilt. Go Sharry!

I will be posting details for our next workshop to be held the last weekend in March soon. Talk to you then!


LinkWithin

Related Posts Plugin for WordPress, Blogger...